目前分類:未分類文章 (3)

瀏覽方式: 標題列表 簡短摘要

Let's take a look at what some of Datavail's clients and DBAs think are best practices for operating MongoDB.

1. Assigning Roles and Responsibilities

Roles are assigned based on the expectations for the new configuration. End users of reports are often immersed in configuration discussions, along with system administrators, data architects, and, of course, DBAs.

2. Preparing for a MongoDB Deployment                                                               

Storage engine solutions

  • MongoDB can be used with a variety of storage solutions — on premises, in the cloud, or hybrid.
  • The A variety of pluggable storage engines can be configured to work with MongoDB. The default package includes WiredTiger and MMAPv1.
  • MongoDB Enterprise Advanced edition includes support for encrypted storage engine and in-memory storage.

Schema design

NoSQL databases do not impose a schema, which is one of their great strengths. They can easily merge data in a wide variety of different formats. But the format they get merged into becomes a schema and its design should be carefully considered.

Database architects and schema designers need to consider the kind and number of documents to be stored, how they are grouped into collections, how they will be indexed and validated. With MongoDB Compass, these rules can be turned into a visual schema that makes it easier and faster to run database queries.

Data lifescycle management

Using MongoDB Zones, DBAs can build tiered storage solutions that support the data lifecycle, with frequently-used data stored in memory, less-used data stored on the server, and archived data taken offline at the proper time.

Managing indexes

Indexes are an important part of optimizing a database system. They can also take up a lot of space and need to be removed when no longer needed. Here are some of the best practices for modeling data as documents, below. The right approach depends on the objectives of your application.

  • Store data as a single document. The entire database can then be retrieved for a single query. This is efficient, but there are size limitations.
  • Avoid creating large documents. The maximum document size for MongoDB is 16MB. For files that are larger than 16MB, such as photos or videos, you need tools such as GridFS to break larger files into a series of smaller files. If the space allocated for a document is more than half the space available, it can’t be replicated in memory while an update is made. You need to monitor document growth and relocate documents when they get too large.
  • Avoid long field names. Long field names increase the minimum amount of space a database requires. The limit for field names is 125 characters. For a similar reason, avoid queries involving low-cardinal fields, because they can result in reports of enormous size.
  • Use MongoDB's new tools to manage Indexes.  The WiredTiger storage engine automatically compresses indexes. MongoDB Compass helps visibleize a database so that opportunities to eliminate infrequently used indexes are easy to spot.

USEFUL RESOURCES:


Mongodb training in chennai


Mongodb official

文章標籤

saravanagumar 發表在 痞客邦 留言(0) 人氣()

Hibernate Many To Many Relation Mapping Example explains about how to implement A Many to Many relationship by using Hibernate

Many-to-many entity relationship , each record of an entity have multiple records in other associated entity and vice versa

On this standalone Hibernate Many To Many Mapping Example, we are using Hibernate With MySQL Database.

Required Libraries:

You need to download

  1. JDK 7
  2. Eclipse 3.7
  3. Hibernate 4.3.1
  4. Mysql 5.1.30

Following jar must be in classpath

  1. Antlr-2.7.7.jar
  2. Dom4j-1.6.1.jar
  3. hibernate-commons-annotations-4.0.4.Final.jar
  4. hibernate-core-4.3.1.Final.jar
  5. hibernate-entitymanager-4.3.1.Final.jar
  6. jandex-1.1.0.Final.jar
  7. Dom4j-1.6.1.jar
  8. jboss-logging-3.1.3.GA.jar
  9. hibernate-jpa-2.1-api-1.0.0.Final.jar
  10. jboss-transaction-api_1.2_spec-1.0.0.Final.jar
  11. Mysql-connector-java-5.1.28-bin.jar

Table Structure:

create table `employee` (
	`EMPLOYEEID` double ,
	`EMPLOYEENAME` varchar (765)
); 


create table `employee_event` (
	`EMPLOYEEID` double ,
	`EVENTID` double 
);

create table `event` (
	`EVENTID` double ,
	`EVENTNAME` varchar (765)
);


Create Employee & Event model classes as per the above table structure

Employee.java

package com.hibernate.manytomany;

import java.util.HashSet;
import java.util.Set;

import javax.persistence.CascadeType;
import javax.persistence.Column;
import javax.persistence.Entity;
import javax.persistence.GeneratedValue;
import javax.persistence.Id;
import javax.persistence.JoinColumn;
import javax.persistence.JoinTable;
import javax.persistence.ManyToMany;

@Entity
public class Employee implements java.io.Serializable {

    
private static final long serialVersionUID = 1L;

    
@Id
    @GeneratedValue
    @Column
(name = "EMPLOYEEID")
    
private long employeeId;
    
@Column(name = "EMPLOYEENAME")
    
private String employeeName;
    
@ManyToMany(cascade = CascadeType.ALL })
    
@JoinTable(name = "EMPLOYEE_EVENT", joinColumns = {@JoinColumn(name = "EMPLOYEEID") },
    inverseJoinColumns = 
@JoinColumn(name = "EVENTID") })
    
private Set<Event> events = new HashSet<Event>();

    
public Employee() {
        
super();
    
}

    
public Employee(String employeeName) {
        
super();
        
this.employeeName = employeeName;
    
}

    
public long getEmployeeId() {
        
return employeeId;
    
}

    
public void setEmployeeId(long employeeId) {
        
this.employeeId = employeeId;
    
}

    
public String getEmployeeName() {
        
return employeeName;
    
}

    
public void setEmployeeName(String employeeName) {
        
this.employeeName = employeeName;
    
}

    
public Set<Event> getEvents() {
        
return events;
    
}

    
public void setEvents(Set<Event> events) {
        
this.events = events;
    
}

}


Event.java


package com.hibernate.manytomany;

import java.util.HashSet;
import java.util.Set;

import javax.persistence.Column;
import javax.persistence.Entity;
import javax.persistence.GeneratedValue;
import javax.persistence.Id;
import javax.persistence.ManyToMany;

@Entity
public class Event implements java.io.Serializable {

    
private static final long serialVersionUID = 1L;
    
@Id
    @GeneratedValue
    @Column
(name = "EVENTID")
    
private long eventID;
    
@Column(name = "EVENTNAME")
    
private String eventName;
   
    
@ManyToMany(mappedBy="events")
    
private Set<Employee> employees = new HashSet<Employee>();
   
    
public Event() {
        
super();
    
}

    
public Event(String eventName) {
        
this.eventName = eventName;
    
}

    
public long getEventID() {
        
return eventID;
    
}

    
public void setEventID(long eventID) {
        
this.eventID = eventID;
    
}

    
public String getEventName() {
        
return eventName;
    
}

    
public void setEventName(String eventName) {
        
this.eventName = eventName;
    
}

    
public Set<Employee> getEmployees() {
        
return employees;
    
}

    
public void setEmployees(Set<Employee> employees) {
        
this.employees = employees;
    
}


}


@ManyToMany(cascade = { CascadeType.ALL }) annotation is used for linking each record of Employee table with Event table and vice versa
@JoinTable(name = "EMPLOYEE_EVENT", joinColumns = { @JoinColumn(name = "EMPLOYEEID") }, inverseJoinColumns = { @JoinColumn(name = "EVENTID") }) is used to define the join table, here it is "EMPLOYEE_EVENT", which is connecting 2 columns ie; EMPLOYEEID belongs to employee table & EVENTID belongs to event table
@Entity declares the class as an entity (i.e. a persistent POJO class)
@Table is set at the class level; it allows you to define the table, catalog, and schema names for your entity mapping. If no @Table is defined the default values are used: the unqualified class name of the entity.
@Id declares the identifier property of this entity.
@GeneratedValue annotation is used to specify the primary key generation strategy to use. If the strategy is not specified by default AUTO will be used.
@Column annotation is used to specify the details of the column to which a field or property will be mapped. If the @Column annotation is not specified by default the property name will be used as the column name.


HibernateUtil.java


package com.hibernate.manytomany;

import org.hibernate.SessionFactory;
import org.hibernate.boot.registry.StandardServiceRegistryBuilder;
import org.hibernate.cfg.Configuration;
import org.hibernate.service.ServiceRegistry;

public class HibernateUtil {

    
private static SessionFactory    sessionFactory;
    
private static ServiceRegistry    serviceRegistry;

    
public static SessionFactory createSessionFactory() {
        
Configuration configuration = new Configuration();
        configuration.configure
("/META-INF/hibernate.cfg.xml");
        serviceRegistry = 
new StandardServiceRegistryBuilder().applySettings(configuration.getProperties())
                
.build();
        sessionFactory = configuration.buildSessionFactory
(serviceRegistry);
        
return sessionFactory;
    
}
}


hibernate.cfg.xml


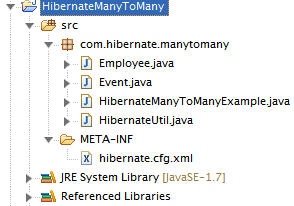
hibernate.cfg.xml file must be under src/META-INF (Please check the screenshot(project structure)


<?xmlversion="1.0"encoding="UTF-8"?>
<!DOCTYPE hibernate-configuration PUBLIC
        "-//Hibernate/Hibernate Configuration DTD 3.0//EN"
        "http://www.hibernate.org/dtd/hibernate-configuration-3.0.dtd">
<hibernate-configuration>
    <session-factory>
        <property name="hibernate.connection.driver_class">com.mysql.jdbc.Driver</property>
        <property name="hibernate.connection.url">jdbc:mysql://localhost:3306/test</property>
        <property name="hibernate.connection.username">root</property>
        <property name="connection.password">root</property>
        <property name="connection.pool_size">1</property>
        <property name="hibernate.dialect">org.hibernate.dialect.MySQLDialect</property>
        <property name="show_sql">true</property>
        <property name="hbm2ddl.auto">create-drop</property>
        <mapping class="com.hibernate.manytomany.Employee"/>
        <mapping class="com.hibernate.manytomany.Event"/>
    </session-factory>
</hibernate-configuration>


Project Structure


Now project structure looks like following


Hibernate Many To Many Mapping Example


Just execute below class and see the output


HibernateManyToManyExample.java


package com.hibernate.manytomany;

import org.hibernate.HibernateException;
import org.hibernate.Session;
import org.hibernate.Transaction;

import com.hibernate.manytomany.Event;
import com.hibernate.manytomany.Employee;

public class HibernateManyToManyExample {
    
public static void main(String[] args) {
        
Session session = HibernateUtil.createSessionFactory().openSession();
        Transaction transaction = 
null;
        
try {

            
transaction = session.beginTransaction();
           
            Event event1 = 
new Event("Quaterly Sales meeting");
            Event event2 = 
new Event("Weekly Status meeting");
           
            Employee employee1 = 
new Employee("Rockey");
            Employee employee2 = 
new Employee("Jose");
           
            employee1.getEvents
().add(event1);
            employee1.getEvents
().add(event2);
           
            employee2.getEvents
().add(event1);
            employee2.getEvents
().add(event2);
           
            session.save
(employee1);
            session.save
(employee2);
           
            transaction.commit
();

        
catch (HibernateException e) {
            
transaction.rollback();
            e.printStackTrace
();
        
finally {
            
session.close();
        
}
    }
}


Output


EMPLOYEEID EMPLOYEENAME
1 Rockey
2 Jose
EMPLOYEEID EVENTID
1 1
2 1
1 2
2 2
EVENTID EVENTNAME
1 Weekly Status Meeting
2 Quaterly Sales Meeting


Useful Resources:


Hibernate Many to Many Relationship


Hibernate Official

saravanagumar 發表在 痞客邦 留言(0) 人氣()


Simple AngularJS application with Yahoo Weather API
After lot of ground work now we can easily start writing our AngularJS application. Let me just give you a brief about what you are going to build. We are going to develop a simple weather forecasting application with Yahoo API. There will be only one screen with one input box, you can enter zip code to see forecast of next 5 days. I am going to use Yahoo weather API to get forecasting data.

So let’s start writing body of index.html.
<body ng-app="myApp" ng-controller="listCtrl">
<center>
<div>
Weather Forecast - Enter zip code and click get forecast
</div>
<!--[if lt IE 7]>
<p class="browsehappy">You are using an <strong>outdated</strong> browser. Please <a href="http://browsehappy.com/">upgrade your browser</a> to improve your experience.</p>
<![endif]-->
<div ng-view></div>
<hr/>
<div>Angular seed app: v<span app-version></span></div>
</center>
<!-- In production use: <script src="//ajax.googleapis.com/ajax/libs/angularjs/x.x.x/angular.min.js"></script>-->
<script src="bower_components/angular/angular.js"></script>
<script src="bower_components/angular-route/angular-route.js"></script>
<script src="app.js"></script>
<script src="list/listController.js"></script>
<script src="components/version/version.js"></script>
<script src="components/version/version-directive.js"></script>
<script src="components/version/interpolate-filter.js"></script>
<script src="services/listService.js"></script>
</body>
Explanation
Observe above HTML properly and you will notice few new attributes starting with ng-

These are angular directives which informs AngularJS framework which DOM element to bind a mentioned behavior. For now let’s continue with the same example and you will understand the purpose of the directive.

Details of angular directives used in above markup are;

ng-app – We use this directive to auto-bootstrap the application
ng-controller – We use this to attach a controller class to specific UI element form view
ng-view – This directive helps to render the template which is attached to particular controller class
Note – please check the path of all js files mentioned in above code. You may need to create some directories like list, services. Such directories are not a part of the boiler plate, List is one of our screen so it’s always better to keep its controller and its template in same directory name “list”.

Now we need to write Angular service which will pull data from Yahoo API.
'use strict';
angular.module('myApp.services', []).
factory('weatherService', function($http) {
var API = {};
API.getForecast = function(countryZip)
{
return $http({
method: 'GET',
url: 'https://query.yahooapis.com/v1/public/yql?q=SELECT%20*%20FROM%20weather.forecast%20WHERE%20location%3D%22'+countryZip+'%22&format=json&diagnostics=true&callback='
});
}
return API;
});

An Angular service is an injectable object. It is a code block where we can write common logic which needs to be shared across application. For example in our application we need to make an AJAX call and get the data from Yahoo API. This part of code should not be reused and thus we are writing it in angular service and later on we will inject this service in one of our controller. This method of writing code is called as dependency injection.

Code explanation – You can see we have written a method in this service termed as – getForecast. Job of this method is to make REST call to Yahoo API and then return the response object.

AngularJS provides $http service to make AJAX calls to server. You can see we have injected $http method in our factory service. Once it is injected we can make use of this method to make a call. The getForecast method is self-explanatory.

Time to introduce first controller of the application.
'use strict';
angular.module('myApp.list', ['ngRoute'])
.config(['$routeProvider', function($routeProvider) {
$routeProvider.when( '/list', {
templateUrl: 'list/list.html',
controller: 'listCtrl'
});
}])
.controller('listCtrl', ["$scope","weatherService",function($scope, weatherService ) {
$scope.init = function(){
$scope.forecastList = [];
$scope.nameFilter = null;
$scope.countryZip = 10001; // new york
$scope.getData();
}
$scope.getData =
Function (){ weatherService.getForecast($scope.countryZip).Success(function(response){
$scope.forecastList = response.query.results.channel.item.forecast;
$scope.city = response.query.results.channel.location.city;
$scope.country = response.query.results.channel.location.country ;
});
}
$scope.getForecastFromZip = function(){
$scope.getData();
}
$scope.init();
}]);
In previous steps we completed writing Angular Service, which will fetch required data from API. We have designed this service so that we can inject it in any controller and thus it can be reusable. Now let's see how to inject this service and define the template to display the forecast data.

Check first code block in which I have configured my template list.html with the controller and URL. I will also share how to design this template, for now let’s continue completing this controller.

Init method – This method is used to initialize required variables. You can see I have initialized countryZip variable to 10001, this is New York’s zip code. So when an application loads it always loads with default data for New York.

geData – This method makes use of injected service “weatherService” and its methods to get the data from API. I am calling getForecast method and passing it an argument which is nothing but countryZip. Once the network call for Yahoo Api is complete service will return the response to our controller in response object. We will pick 3 objects from this response, forecast, country, and city. We will now learn how to show these 3 objects with template.

getForecastFromZip – when user enter some zip code and hit submit then this method gets called to get the data for entered zip code.

Let’s write App.js – to bootstrap the application
'use strict';
// Declare app level module which depends on views, and components
angular.module('myApp', [
'ngRoute',
'myApp.list',
'myApp.version',
'myApp.services'
]).
config(['$routeProvider', function($routeProvider) {
$routeProvider.otherwise({redirectTo: '/list'});
}]);

We have just created some angular modules including service and controller. Next step is to inject them in application. I have named my application “myApp”, if you notice in the index.html body tag then you can see same name attached with tag ng-app. Now check app.js to understand how these modules can be added to angular application.

Create Template to display the forecast.
<input type="text" ng-model="countryZip" placeholder="enter zip code..." /> <input type="submit" name="submit" value="get forecast" ng-click="getForecastFromZip();">
<br/>
<br/>
<table border="1" cellpadding="2px;">
<thead>
<tr><th colspan="4">Forecast of - {{city}} ({{country}})</th></tr>
</thead>
<tbody>
<tr ng-repeat="forecast in forecastList">
<td>{{forecast.date}} - ({{forecast.day}})</td>
<td>
{{forecast.text}}
<br/>
High - {{forecast.high}}<br/>
Low - {{forecast.low}}
</td>
</tr>
</tbody>
</table>

We have received data in 3 variables from controller and we have to show these 3 variables in our view.

Search box – check attribute ng-model attached to input box. ng-model=”countryZip”. This is very important step to understand. We have initialized the same variable in controller init method and same is bound here with input box.

Observe the attribute ng-click attached with submit button. It’s bind with getForecastFromZip method. It means that click event of this UI element (submit button) is bind to call getForecastFromZip method of the controller defined with ng-controller. If you are confused with this point then please go through index.html (body tag) .

Forecast of – {{city}} ({{country}}) – Check this line in my template. This is AngularJS way of writing variable value. In controller we have extracted 2 variables i.e. city and country. So if you want to echo them in your view then you simply have to embed them in {{}}.

ng-repeat – very important and most required directive while designing any UI component is ng-repeat. This can be used when you want particular UI element to repeat multiple times. In our example we need to show all records which are fetched from service. My template is based on table so I have to repeat <tr> multiple times. That’s the reason ng-repeat tag is added to <tr> tag and not table.

Now refresh your browser and check. Following is the screenshot of landing page.


Resources:


Angular training in chennai


Angular Official
saravanagumar 發表在 痞客邦 留言(0) 人氣()